Dokumentations-Portal
- Anwenderhilfe
- Administrationsdokumentation
- Entwicklerdokumentation
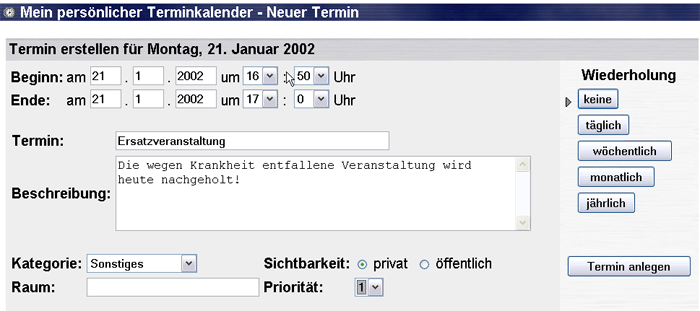
You can create appointments very easily. Simply click on the Edit subitem, and you access the window for creating new appointments directly:

If you have not previously selected any Day view, the appointment calendar simply jumps to tomorrow’s date, but that is not very important: Under
You now have the opportunity to enter the date and time on which the appointment begins.
You can enter the date and time when the appointment ends. You can also select the times from a list as soon as you have clicked on the down arrow.
Now you can enter the current appointment. The appointment that you have entered now also appears in the day, week, and month view. If you want to input a
of the appointment, you can do so in the slightly larger field under Appointment.
 However, the Description is not shown on the overview pages. It only serves as a memory aid and is then displayed when you click on the appointment in one of the views and then again change to the Edit mode.
In the field below it you can assign the appointment to a
- for example session, quiz, excursion, test, birthday, family or holiday are also possible. Depending on the category, the appointment will be displayed in a different colour. If you do not select a category, the default setting is Other.
With the options private or public next to the Visibility designation, you state whether the appointment should only be visible in your Stud.IP calendar or whether it should also be displayed on your personal homepage.
 Only the public appointments of the next two weeks are displayed on your personal homepage. Appointments which lie outside this time window or are marked private do not appear.
In the Room field you can enter where the appointment will take place.
Here you can specify how important an appointment is. You can assign priorities from one to five.
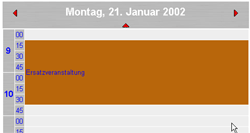
If you are satisfied with your entries, simply click on Make appointment. Now the new appointment is displayed with colour highlighting in all views:

If you desire to have a appointment repeated at intervals (e.g. birthdays, which reoccur reliably every year), that is not a problem either. The Repeat field on the right-hand side of the image performs this task. By default it is set to none, but you can specify whether an appointment should be repeated daily, weekly, monthly or even annually there. If you choose one of these types of repetition, you see new fields at the bottom of the page:

The sample image above refers to daily repetition. If you select one of the other repetition options, you are provided with further or other options for the repetition of appointments.
you can now select whether an appointment is to be repeated every day, every two days or only every X days.
Does not repeat the appointment on the weekend.
If you enter Never here, the appointment will be repeated forever. However, if you select at the date given at the right you can enter the final date for the repetition.
With a click on the Change appointment or Save appointment the final date is saved.
 The Stud.IP appointment calendar offers many options. Take some time to experiment. You cannot cause any damage. In order to delete an appointment explicitly and irrevocably, you must expressly click on Delete in the Edit view.