Dokumentations-Portal
- Anwenderhilfe
- Administrationsdokumentation
- Entwicklerdokumentation
The StudIPad is another Tool you can extend your Stud.IP course with. With the StudIPad more than one author can work on the same text. It is helpful for presentations, take home exames, group and seminar work, brainstorming, glossary, protocolls, samples and similars.
Auf dieser Seite... (ausblenden)
Click on the StudIPad symbol on the plugin board of your course ( ) or on the
  -Symbol in the course overview to have the set StudIPad of the course advised. Subsequently you can open the StudIpad by clicking on the "open" button.

You then get to the edit page of the StudIPad.
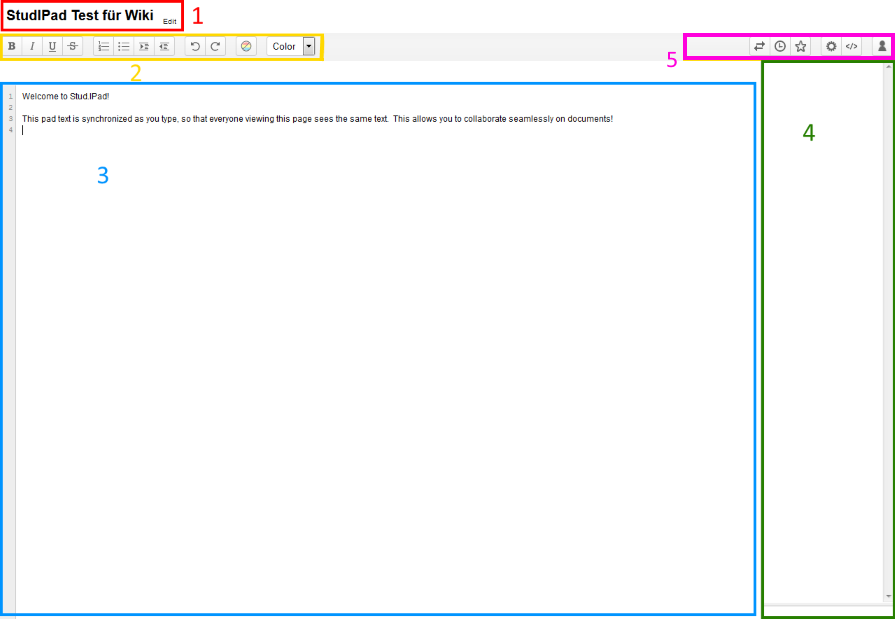
Abb. 1
 Symbol on the headline.
The StudIPad works in real time. That means that changes immidiately reach all the participants who ativated the corresponding StudIPad. To keep an overview who changed the text and what got changed every author has its own colored text. You can find the corresponding corlor ledgend by clicking on the - symbol on the right top. There you can also change your color according to the color circle by clicking on your colorfield.

StudiPads central plank (the creation of the actual text) is intuitively featured. Give full scope to your creativity!
Like already mentioned you can change the text by using the formatting field.

Mark your text within the text foeöd amd click on one of the simboles for formatting them. You can choose between B for bold, I for italic, U for underlined and S for crossed out on the left box. Within the second box you can create a numbered list or a bullet list or intend your text.
You can reverse the latest change by clicking on  . Afterwards you can repeat this change by clicking on
  .
When your text should get a new color you can choose a color with the drop down menu on the right.
Conclusiv there is a button to reverse all author colors (
.
When your text should get a new color you can choose a color with the drop down menu on the right.
Conclusiv there is a button to reverse all author colors ( ). With that you can delete the color legend of all authors of the text. The marked text will subsequently colored white.
Above the text formatting tool there are further options that you can find on the right top (point 5 in Abb. 1).

 Import/Export: You can import and export something of your text always. Take care that the import can just take place in the format *.txt . For exports you can use *.txt, *.html or *.dokuwiki .
 Version History: After
 every change within the text a new version of the text got saved in the background. By means of this button you can see the process of the text and you can jump to every arbitrarily point of time of the text. Click within the view on the play button to acctuate the changes of the text in something like a "video". Click on the - Symbol to export a specific version. With a click on "back to pad" you will get to the actuall version of the StudIPad.
 Mark Version: You are able to mark a version allways. The versions occour on the version history named above with a star on the time gab. This option is useful to mark finished part processes within the text changing for making the version history more easy to grasp.
 Pad Settings: Here you have some more possibilities to change the interface of the pad. For example you can hide the chat, the author colors or the line numbers. It is also possible to show the written characters or to change the language of the pads interface.
 Share this Pad: StudIPads can be shared with the world at any time. Share the link with all persons that should work with the pad or that should reed the document for corrections. You have to choose if the person should be allowed to work on the pad or if the person should only get reading permissions (by setting a tick
 before you choose the link to copy). Show Current User: As allready pointed out, you can here see all user that are using the StudIPad at that moment.
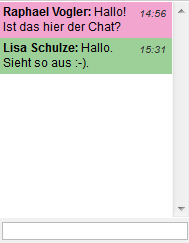
On the right side stands the chatbox. Here you are able to communicate with other users beyond the document. The chat history stais when you log out from sthe StudIPad or the Stud.IP.
< Activate StudIPad | Overview | Mediaserver >
