Dokumentations-Portal
- Anwenderhilfe
- Administrationsdokumentation
- Entwicklerdokumentation
The next step in setting up a course primarily specifies the responsible people and regulates who may later participate in the course.
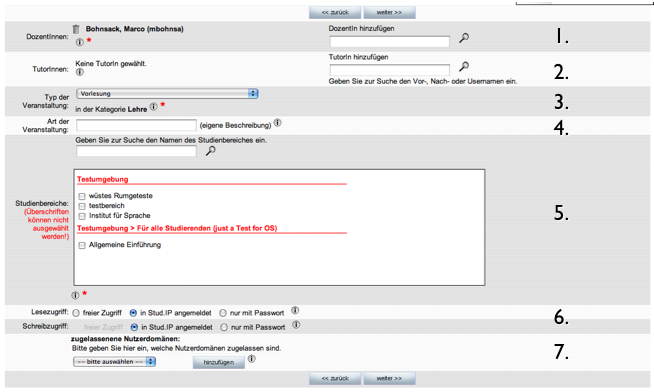
1. Course lecturers
Please specify the course lecturer. Normally, that would be you. If there are additional lecturer, you can look for them in our system. Enter their name in the Search box and click on the Magnifying glass icon (DO NOT PRESS "ENTER”!). All the lecturer of the home institution as well as the accompanying institutions will be found.
2. Tutors
Here you can select your assistants. Tutors have similar permissions to those of the lecturers in courses; they can, e.g. upload references, prepare schedules, etc. However, they cannot change basic course data such as “lecturers” — only the lecturer is able to do that. Use the search features as described in 1. to enter your assistants. Incidentally, only research assistants registered at your institution are on the list. You cannot designate students as tutors.
3. Type of course
In the area of teaching (instruction) you can, e.g. specify whether it is a basic or advanced study course, or whether it is a lecture or seminar course. The course is later classified, e.g. in a university prospectus according to this data.
4. Kind of course
In this field you can use your own freely defined description or classification. The following are conceivable, depending on what you consider to be most meaningful: "field trips", “practical meeting” or “block course”.
5. Fields of study
Fields of study is optional. Only when the course is in the “Teaching” (instruction) area please state the field of study in which your course best fits. If the field of studies is not listed here, you can look for it. If that does not help either, please contact your system administrator, he will insert the field for you.
6. Security
Here you can state who should have access to your course. This specification concerns reading and writing access. Reading access means that the course member can look at all the materials and discussions in your course, but cannot directly participate. Writing access accordingly means that the course member can, e.g. write their own Postings in the course’s Forum.
means that someone who discovers Stud.IP in external pages can browse around in your course. This person is not registered and therefore has no name. These “nobodies” are absolutely not permitted to write. If you do not want someone from outside the university to look at your work, set the access to the standard setting.
In order to allow only those participants whose names are known and who have re-registered by mail to read and write in the system or activate the following option:
To sign into the course a password is needet. Therefor you have to create a password. This is an effective method for limiting the number of participants as well as for excluding “troublemakers” from the course in the Teaching (instruction) area because no one can enter the course without the correct password. You can inform your students e.g., in the first course session. If you plan to set up a course in the area of Research or Organisation, you should always implement password protection; otherwise, all participants in Stud.IP could follow committee discussions.
If you selected participant limitation in the first step, you do not have to enter anything here in this case.
7. If you are satisfied with your entries, click on Continue.