Dokumentations-Portal
- Anwenderhilfe
- Administrationsdokumentation
- Entwicklerdokumentation
Auf dieser Seite... (ausblenden)
What is the difference between Stud.IP and a word processing programme? — Indeed, you can write a lot, but the text always looks the same. Unfortunately, you can not press any buttons to make the bolder or to underline in WinWord, but you can indeed format text in Stud.IP while writing it and ultimately you have the same options.
Text formatting in Stud.IP is basically the same like writing a normal text. Only if you, for example, desires to underline one or more contiguous words, you have to enclose the words on the left and right with two underline “__”. It should look like this.
A __very__ long text.
In this context, it is important that the underlines are concisely with the text to be formatted, i.e. that there are no spaces in between. Instead of the single word very there can also highlight several words; indeed, complete paragraphs can be overarchingly formatted in the text. After the two underlines have been typed, Stud.IP searches in the contiguous text until it finds two further unterlines and only then does it stop formatting the text.
If one desires to write in italics, one precedes analogously, in the example one must only replace the underlines with percent signs % in each case.
A %%absolutely unbelievably%% long text.
And this is achieved analogously with other formatting options. See the following table:
| Char. | Effect |
| ++ | A very large text. |
| ** | A very bold text. |
| __ | An underlined text. |
| %% | An italicised text. |
| -- | A very small text. |
| >> | A superscript text. |
| << | A subscript text. |
| ## | A few words with the same letter width. |
Of course, one can combine these effects and nest them within one another. The important thing is that one also terminates every intiated formatting instruction.
++++**e = mc>>2>>**++++
These additional signs, which one places in front of and after the text to be formatted are termed — in the style of HTML programming or customary forum script languages — tags. Moreover, real HTML tags cannot be incorporated for safety reasons. Our Stud.IP tags are safer and shorter!
There is also a simplified form of text formatting. If you only desire to format a single word, a single formatting symbol in in front of and behind the word to be formatted is sufficient. There must be a space before the first formatting symbol and behind the second one.
If it has to be %fast% for a change.
Among the possible forms of emphasising, “Striking through” is an exception because in this case different formatting symbols are used at the beginning and end of the text.
A {-completely unnecessary-} example.
To write a link on which the reader can click with a mouse in order to move to another page in Stud.IP or in the web, you first need the desired address. This is usually the address of a HTML page, which begins with "http://www...".
The syntax is then:
[the text which will subsequently be the blue link in the context]http://www.studip.de
Furthermore, one can also link an email address. In this case one simply writes the addr@ss.de instead of the http…
In Stud.IP one can easily see whether or not a link is linked to an internal page in Stud.IP. If the following symbol precedes a link  , the link indicates an external page; otherwise, the
  symbol appears.
On the other hand, it is very simple to write a list in Stud.IP. To do this, simply write a single minus sign “-“ before the beginning of the paragraph, which is to be the first entry in the list. The second entry then in turn requires a preceding minus sign and so on. An example is given below. And make sure that the minus sign is separated from the paragraph by a space so that it will not be mistaken for text formatting.
If you write two or more minus signs, the list entry is indented and becomes part of a sublist.
Example:
- Introduction
- Main body
-- Argument 1
-- Argument 2
- Conclusion
becomes
If the list is to be numbered, i.e. a numbered list, simply write an equal sign instead of a minus sign. Otherwise, it is exactly the same. The example is, as it were, “homework“.
When the objective is to specifically indent a paragraph, i.e. to shift it to the right away from the page edge, follow the following instructions:
 )again
At the moment, this may sound a bit complicated, but it is really only difficult to describe. The best thing to do is to try it yourself. The paragraph will be indented one space.
If you now desire to start a new paragraph within your indented text, which should also still be indented, move to a new line and type a single space in front of where the text should continue. If you should type two spaces, the new paragraph will be indented one space more than the previous one.
However, sometimes the options provided by lists and indented paragraphs are still not enough to arrange the text meticulously. Tables can also be inserted in Stud.IP. To do this, one uses a “lonely“ character, namely the vertical bar "|". Indeed, only very few people even know where to find this character on their keyboard. To type it, simply press the “Alt Gr“ key (to the right of the spacebar) and simultaneously the “<” key. That's all there is to it.
But to go back to the tables. To create one, first type a “|“ once at the beginning of the paragraph to show that a table begins. Further “|“ signs then separate the intended table cells from one another. And another “|“ is placed at the end of a table line. The next line of the table looks exactly the same and then all lines are properly aligned one after another as in any proper table.
| Name | Matriculation number | Degree programme |
| John Doe | 55555 | Math diploma|
| Darth Vader | 66 | AApplied fine arts |
| Name | Matrikelnummer | Degree programme |
| John Doe | 55555 | Math diploma |
| Darth Vader | 66 | Applied fine arts |
Unfortunately, there are no additional possibilities to use special formatting in the table, such as forced cell width or to make the table margin transparent. More’s the pity!
are very simple. To insert a dash, i.e. a sharp horizontal dividing line, into a posting or a category, change to a new line in the Editor and then type two minus signs one after another.
The
--
thus becomes a
The thickness of the line can be influenced by a subsequent single-digit number.
--5
--9
After many users have uploaded a picture for the header of their homepage, the desire to upload more pictures. Unfortunately, Stud.IP cannot do that. But it is possible to incorporate images which have already been uploaded somewhere in the Internet, i.e. to link them. Basically, this is possible with the following syntax::
[img]http://www.adresseofthepict.ure/picture.jpg
Thus, first search for a picture, which you want to link, in the Internet. In most browsers, one can find the image address by using the right mouse button and a menu item such as “Copy image address”. And then insert this address behind the [img]. This is done without a space. And please ensure that there is no copyright infringement.
Thus,
[img]http://www.studip.de/images/studip_logo.gif becomes:
Furthermore, there are different parameters which one can add to put the picture in the right light.
| Parameter | Effect |
[img=Studip-Logo]http... | The picture is given a title, which is displayed, when the mouse lingers above the image. |
[img:http://www.studip.de]http... | When one clicks on the picture, one is transferred to the address given behind the colon. It is important to use an equal sign in the title; here, however, a colon should be used. |
[img:50]http... | The picture is as wide in pixels as the number states, i.e. in this case 50 pixels. |
[img:right]http... | The picture is positioned at the right-hand margin of the screen. If one uses "center", the picture is centred; "left" is quasi the default setting; its use is unnecessary. |
Naturally, one can also combine these parameters in an arbitrary manner, such as: [img=Zur Studip-Seite:100:http://www.studip.de]http://www.studip.de/images/studip_logo.gif
But how does one get images which one has on the hard disc at home into Stud.IP?
Upload these pictures. There are two possibilities: If you wish to make the picture available in a Stud.IP Forum, for example in a thread or in a Wiki, you can upload the picture in the respective course as file and link to it from the forum or from the Wiki. This is a very elegant solution. If, however, you desire to use the picture to make an SMS or your own homepage more attractive, you must find a provider in the Internet where you can upload your photos. Since no advertising should be done here, we will not advertise. But you can simply ask other users, who have pictures on their homepage, how they did it and which provider is particularly suitable for this.
Audio and video files can also be incorporated in Stud.IP if they are in one of the supported formats (MP3, MP4, OGG, WAV, WEBM, Flash-Video) and can be reached via an Internet address or have been uploaded in the course’s Document folder. In this context, please note that not all formats are supported by all browsers. Flash videos require the Flash Plugin; all other formats require the current browser versions. The incorporation of audio and video contents is performed analogously to picture incorporation, a player available in Stud.IP is incorporated with the aid of a special format element. In this context the following variants exist:
[audio]url.der.Audiodatei
[video]url.der.Videodatei
[flash]url.des.Flashfilms
As in the incorporation of pictures, additional options can be stated here, for example:
[video=Titel]url.der.Videodatei The video contains a title, which will be displayed when the mouse lingers over the player.
[flash:x:center]url.des.Flashfilms incorporates the player centred with a width of x pixels.
[flash:x:right]url.des.Flashfilms incorporates the player in a right-justified position with a width of x pixels.
In Forums or in the Guest book you have the option of quoting someone or a special source, so that the context on which you are now expounding is clear. The syntax for this is more simply shown than explained:
[quote] bla bla bla [/quote]

The text which you want to quote is then, of course, between the so-called Quote-Tags ( [quote] ). Optionally one can also mention the source which is being cited by introducing the tag with a [quote=respective source of the text]. That then looks like this.
[quote=Darth Vader]The Emperor does not forgive as ->recklessly as I do.[/quote]

Another note on our behalf; In the Stud.IP Forum one can answer or indeed ”quote“ third party postings. If one clicks on “Quote”, this is basically an answer, and the entire previous contribution will be quoted by means of the Quote Tags. One normally does this to make the discussion more lucid. However, please quote correctly, i.e. briefly and concisely. It is simply not fun to read everything in duplicate or triplicate. Therefore, please shorten the text by using the three customary ellipsis points, […], down to the core of the statement which you desire to particularly consider.
In Stud.IP Wikis some people notice the lack of an opportunity to write comments on one’s changes. For this reason, a feature was developed which only exists for Wikis in Stud.IP. One can write a small comment, mention one’s self as author, and only a small marker, which does not take up very much room and does not disturb the flow of reading, appears in the text. If one clicks on the marker or holds the mouse cursor above it, the comment appears— Really a very simple thing.
Write comments in Wikis as follows:
[comment=John Doe]I really don’t have anything to say.[/comment]
You probably are already familiar with the terminology — the comment is between the Comment Tags, i.e. between the brackets. Instead of John Doe, write your own name down (it does not have to be with your complete title and third middle name). If the comments begin to take the upper hand and it becomes confusing, one should, however, perhaps drag a thread into the appropriate Forum.
Despite the utility of these text-formating options in Stud.IP, it is possible that one actually would like to write a lot of percent signs without having the entire text italicised and the percent signs not being displayed. Admittedly that does not occur very often because one can indeed always write single percent signs which are also correctly displayed. But as is well known, caution is the watchword in the Internet, and therefore there is also an option in Stud.IP with which a section of text can be marked such that it will not be formatted in any case. The text section is bracketed by a Nop-Tag, i.e. one writes [nop] at the beginning of the section and [/nop] at its end, and not character between these two tags will be interpreted as formatting information.
However, formatting which was defined outside of the Nop-Tags will also be used in the tagged section. In that case, you can namely write the endangered text and also format it.
[nop][img]http://www.studip.de/images/studip_logo.gif[/nop]
Clever, isn’t it?
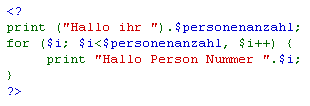
For computer scientists and those who still desire to become one, there is also a tag with which one can make programme code visible in Forums. Simply use the expression [code]

Perhaps some of you have already realised that the Code-Tag does not really do much more than if one were to write: [pre][nop][/nop][/pre]
That's true, the Code Tag is thus another shortcut for this. The text is shown in monospaced style so that indentions can be correctly displayed and so that Stud.IP will not interpret the programme code as formatting instructions. Additionally, if the core is PHP code, Stud.IP even ensures that it is appropriately highlighted.