Blubber
There is an element within Stud.IP that could be called „social network“. At least it works that way. It is a fusion of forum and chat and it should be rather easy to use. No annoying buttons at all. The aim is to communicat easlily. Everything is based on social networks (whatever those may be) so that users can find their way around as quickly as possible. To highlight the aspect of real-time communication we called it “Blubber”. Blubber should be fun!
The global Blubber stream
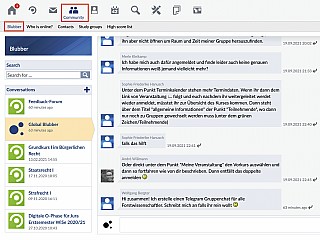
Blubber can be found in the main navigation under „Community“. Here you can find all blubbers of your buddies, all blubbers from your courses and all private blubbers that are more or less directed towards you.
A “blubber” is nothing but a short - possibly formatted - text written by someone. For example like this one:
You can reply to a blubber in the little reply field below it. Enter your comment and press enter – the blubber will immediately show up under the previous blubber. Yes, immediately! Blubber works in real-time communication just like a chat. If someone else replies you will see the blubber without having to reload the page. Just like a chat, but continuously and with text formatting.
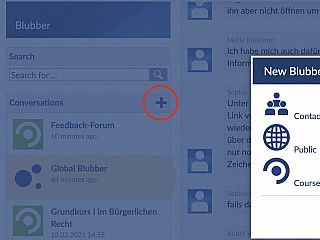
Besides the global blubber stream there are more blubber types. Press + in order to open a new window in which you can select the context of the blubber. Context? Yes, there are three kinds of blubbers.
- Public Blubbers: these blubbers are visible to all users that have added you as a buddy. Please note: It is not necessary for you to add these users as a buddy, but they need to have you on their buddy list. To have someone on your buddy list doesn’t mean anything else but to “follow” them, just like it’s called in several social networks.
- Private Blubbers: in case you don’t like your blubbers to be public or your blubbers deal with private things, it is a better choice to use a “private blubber” instead. You decide yourself who gets to see the blubber. To do this, select one or more contact groups on the right side of the check list. Moreover you can theoretically not select any contact group and expand the target group of your blubber (or the comments) by single users – but more about that later.
- Course Blubbers: in this case the group of users that can see your blubber is also limited – to one course. Here you can only select those courses in the check list next to the icon in which blubber has been activated (this needs to be done by the lecturer of the course). If you aren’t enrolled in any course or in none in which blubber is activated, you won’t see the entire selection box about Course blubbers at all.
Advanced functions
If you look carefully you can see a lot of information in the infobox on the right side. With paragraphs, photos, links to other users etc you can make your blubber look nicer – just as we know it from other social networks.
- Paragraphs: When you press “Enter” the blubber will be sent. However, if you would like to create a new paragraph you have to click "Shift+Enter" instead. The same problem exists in instant messengers. Once you get used to it it’s really easy.
- Text formatting and smileys: a nice extra feature of blubber is that you can use all text formatting options that already exist in Stud.IP anyway. This means you can write text in italics or bold, you can strikethrough a word use superscript, you can use LaTeX formulae, add pictures, videos, tables etc. etc. And of course you can add smileys :)
- Drag&Drop of files: If you would like to add pictures or videos you might have the problem that your file has to exist somewhere on the internet so you can copy the link (URL) and copy that to the blubber. This might be a bit complicated. Most often the picture is still on your computer and not online (that would be a pirated copy otherwise). This is why there is an easy function within blubber: Just drag the file from your desktop or anywhere else on your computer with the mouse into the blubber input field. A small loading symbol shows up and within seconds a link will appear where you can insert your field. This works the same way as if you copied a link from the internet. Pictures show up as pictures, videos as videos and all other files as links. If the blubber is connected to a course the files will appear in the documents area and can be viewed, re-named, moved etc there.
- Mentions: Just like in all social networks you can mention other users in your post. Usually this happens like @blubbermaster and of course the part after @ can be changed. You can either write the username after the @ or the full name in quotation marks (@”Rasmus Fuhse” would work as well as @Krassmus). Of course there can be several people with the same name thus the user name is always the better choice. But why does one need mentions within the blubber? The mentioned person will immediately be informed via a personal message generated by Stud.IP. According to the user’s settings they will also receive an e-mail. This way you can be sure that the mentioned person won’t miss the blubber. With private blubbers this mention has the effect that this person will be added to the users who can read the private blubber. This also works with comments. It can be useful if you decide afterwards that more people should be added to the list than originally planned. If this happens within a course blubber the person will be informed about the blubber but not automatically added to the course. The user can enroll to the course and join the blubber if they would like to and if the course does not have a restricted access.
This was basically a long version of what’s already written in the infobox. There are some more extra feature that are not mentioned …
- Hash tags: Hash tags are a popular features in social networks for categorizing messages. They are very easy to use: #excercise2 could be a hash tag for all blubbers that have something to do with exercise 2. You can click on that hash tag and see all blubbers witch belong to it.
- Editing posts: If you have been using blubber for a while it’s possible that you regret a few things or your made typos that you would like to edit later. No problem. If you move your mouse over your post you will see a tool symbol next to the time stamp in the upper right corner. If you click on it you are able to edit your post. Click enter or just leave the input field by clicking somewhere outside of it to save your post. In order to delete the entire blubber just remove all the text and click enter. The blubber will disappear.
- Editing posts of other users: As tutor or lecturer of a course you can edit the content of the course. This also applies to the blubber. You can edit blubbers of other users the same way as your own. However, the user will be informed by a personal message that includes both the old and the new content of their post. The user then could undo your changes. No information will be lost. Just be careful as a lecturer or tutor how you use this function. Sometimes it’s easier to correct someone by using the comment function. The editing is rather meant for situations like e.g. someone posting the solution to a class exercise so that others can copy it.
Wait a minute – what exactly is blubber now? Chat or forum?
This question cannot be answered properly. Sometimes it’s a chat, sometimes a forum, but using private blubbers it can also be sometimes like a messenger, but faster and still a bit different than an usual e-mail. Using the hash tag function within courses it can serve as a didactic tool. Or the lecturer just wishes to upload an instructional video via drag&drop. That’s why we didn’t call it forum, chat or didactical-widget but blubber. Just use blubber the way you think it is useful.
Customized blubber streams
If you use blubber extensively it is possible to lose the overview within the global blubber stream. On the other hand you would like to see all news related to a certain hash tag without having to look for the hash tag first. You can simply create as many user-defined streams as you like that show exactly those blubbers that you want to see. First of all a few examples why you might need this:
- A lecturer is in three courses and seven committees that all use blubber. The three courses are important because the lecturer is responsible for them, however only two of the committees are interesting, the others are not that important and he’s only in there pro forma. The lecturer noticed that there is a lot of chatting going on in the courses and the few blubbers of the committees are getting lost among all the other posts. To put everything into order it is possible to split up the two into different streams – one for the courses and one for the two
- A power user student would like to see more blubbers than just of his twenty contacts because his stream is rather empty. So he would like to have a stream of all public blubbers that use the hash tag #bulletinboard. However, this stream got too big because there are too many cat pictures that all of his friends post. Luckily all of them have the hash tag #catcontent or #lolcats. So he can filter the stream to remove all blubbers that include #catcontent or #lolcats. This would be an ideal blubber stream that he would like to see instead of the global blubber stream.
This so-called stream of blubbers is built up of two stages. In the first stage all blubbers that meet certain criteria are collected. Then one has a big collection of blubbers. In the second stage this collection of blubbers can be filtered by certain criteria. Let’s take the global blubber stream for example. It is mainly a collection of blubbers of all users that I follow (including myself) and all blubbers that are posted from my courses. It is not filtered. The profile stream is a bit different. This stream uses all blubbers from the entire system and is then filtered so that only the blubbers from a certain person that are public are visible. Neither course blubbers nor private blubbers nor blubbers of other users appear there.
< Messages | Overview | Anonymous feedback >


