Evaluations
Overview of evaluation management
In Stud.IP you have the opportunity to conduct evaluations. In this context, you can resort to public evaluation templates or also prepare your own evaluation templates. You must be on the Administration page of the course in which your want to publish the evaluation. Click on the Evaluations subitem there.
More or less the following page opens up:
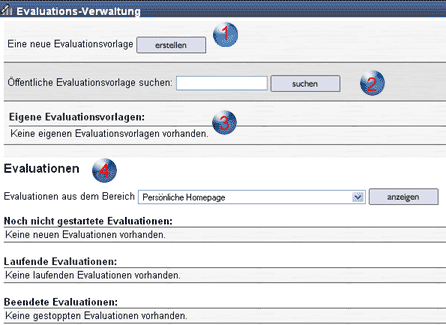
You see that Evaluation management has four areas:
In Area 1 you can prepare new evaluation templates. In this context, we are not yet dealing with the publication but merely with the preparation of the template which can be used for publication after you have prepared it.
In Area 2 you can search for existing templates in Stud.IP. Templates which have been found are displayed in this area. You can then modify them and subsequently publish them. Thus, you do not have to prepare the templates yourself. This is normally the most efficient way to perform evaluations.
In Area 3 all the templates which you yourself have prepared or that you found in Stud.IP and have added to Area 3 are displayed. To use these templates, you must add them here (i.e. to the list of your evaluation templates).
In Area 4 you see an overview of all your evaluations: those which have not yet run; those that are currently running; and those that are no longer running. If you have not yet published any evaluations, this area is empty — as in the example above.
Performing evaluations
- To actually perform an evaluation, enter at least 3 letters of an evaluation template (e.g. “eva“) in the "Search for public evaluation template:" and subsequently click on the search button. You then obtain a list of all the templates which exist in Stud.IP.
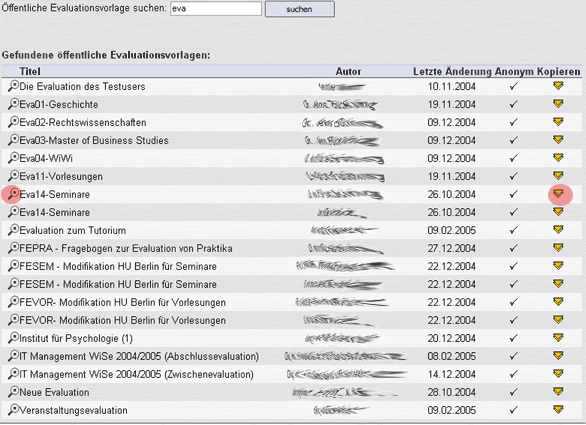
- For the three letters “eva”, which we entered, there are both evaluations with this name and other evaluations which contain the letter chain “eva” in their description.
 Enter three percent signs (%) to obtain a display of all the templates which exist in Stud.IP.
- In front of the name of the template you see a magnifying glass (in this case highlighted in red). Click on it and you can examine the evaluation in a new window.
- At the extreme right you see an arrow (also highlighted in red) behind each template. You have to copy the template that you want to use into the list of your evaluation templates (Area 3). To do this click on the arrow behind the appropriate template.
You can also edit the existing templates and thus adapt them to your needs and wishes. However, to do this the template must have been copied into Area 3. (Thus, to edit, also click on the yellow arrow.) You find information on editing templates here.- The copied template appears — after you have clicked on the arrow — in the list of your evaluation templates (Area 3).

- Open the template which you desire to publish in order to specify additional properties, e.g. from when until when the evaluation should take place. To open it, click on the arrow located at the left (in this case highlighted in red) or on the name of the template. In the example above, there is only one template in the list. Naturally, you can also copy more templates into the list. When you open a template, you see the following:
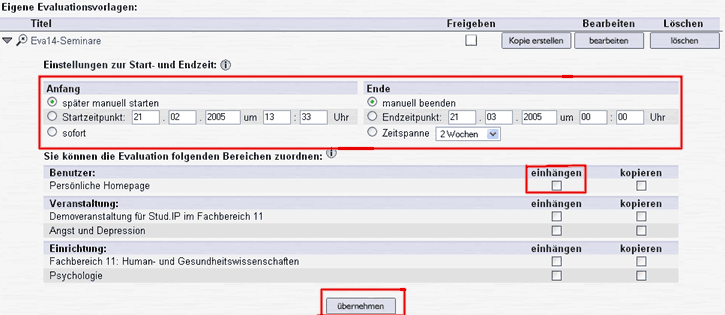
- Here you can decide when and how long the evaluation should run and above all where. You specify a starting time or start it later manually and an end point in time or end it manually. Moreover, you can decide where the evaluation is to be published. You then put a checkmark behind the corresponding course on attaching or copying the template.
On the difference between attaching and copying: If you attach an evaluation, no new instance of the questionnaire will be generated. Regardless of from where the questionnaire is filled out, the entries are written in the same dataset. The data are pooled.However, if you copy an evaluation into an array, a completely new dataset is created.
Thus, in order to use one and the same Evaluation template in different courses, you can copy it into each of your courses. There are then the same number or datasets as courses. Each course will be individually evaluated, but the evaluation is based on the same template. When you attach the template in your courses instead of copying it, only one dataset is created and you obtain an evaluation across all courses. Even if you, e.g., would like to evaluate a course and would like to use both your course page and your institution page, you will have to attach the questionnaire in order to evaluate only one dataset. If you only publish the evaluation in your course, only the participants in ths course will have the option of filling out this questionnaire.
- If you have activated all settings, click on the button to accept your settings.
- In Area 4 — the survey area for all of your evaluations — you will find the evaluation which you have just prepared.
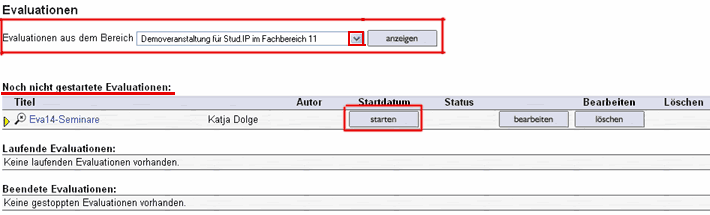 Important: You must select the area in which the evaluation is to take place (e.g. your course or your profile, etc.), as otherwise the evaluation will not be displayed. To do this, select the corresponding area in the selection menu and click on display. Now the evaluation will be displayed in that area.
- If you have selected the “Manually start later” setting, start the evaluation here by clicking on the “start” button. The participants in your course can now fill in the questionnaire.
- After you have started the evaluation, you will find it under “Ongoing evaluations”.

The buttons have the following functions:
- Stop: The evaluation is stopped. Now the questionnaire can no longer be filled out.
- Reset: The evaluation continues, but all previous entries are deleted.
- CSV-Export: The present answers from the question are saved as CSV file (can be edited with Excel). This can be downloaded on the next page.
- Delete: The evaluation is deleted from the corresponding area. Additionally, all entries are deleted.
- Evaluate: Die Evaluation wird ausgewertet. Sie wird dadurch nicht gestoppt.
Analysis
You can have your evaluation analysed by Stud.IP. Both the absolute and percentage frequency are stated. Additionally, the frequencies are presented graphically. You can also have the evaluation output as a PDF file.
In order to have your evaluation analysed,
- Click on the “Analysis” button to the right of the evaluation. Your evaluation will be evaluated. You see more or less the following:
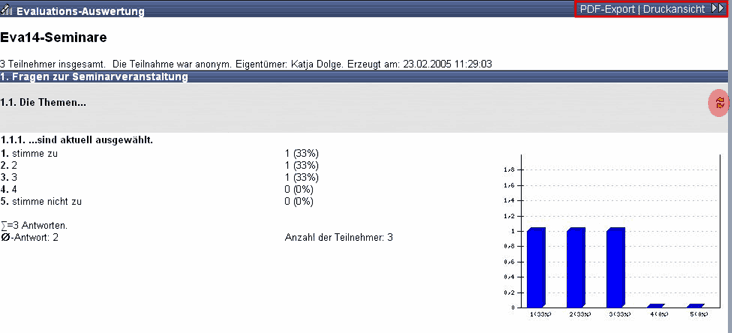
All the evaluated questions are present as in the example above on one page.
- On the right you see two yellow arrows (highlighted here in red) on the title bar of each block. If you click on the two arrows, the presentation form changes and you see the blocks evaluated in tabular form instead of graphically.
At the top right you see 3 buttons (outlined in red here).
- PDF export: If you click on this, the evaluation is opened in your browser or in Acrobat Reader in PDF format (depending on the browser settings). Now you can save the evaluation as PDF file on your hard disc. (File – Save)
- Print view: If you click on this link, a new window opens with a printable version of your evaluation. Print it using your browser’s print function.
- Double arrows
 : If you click on them, you access the configuration of your evaluation.
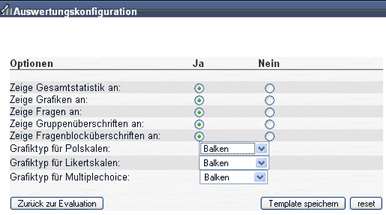
- The standard configuration is shown in the image. If you change these settings and would like to retain the changes for future analyses of this special evaluation, click on “Save template”. If you desire to undo the changes, click on Reset and all changes are reset to the standard configuration.
- You return to your evaluation via the “Back to evaluation” button.
Editing public evaluation templates
The easiest way to conduct evaluations is to resort to public templates. If there is no public template that exactly fits your desires, you can also edit these public templates and subsequently use the modified version as questionnaire.
You can open the original evaluation template in an extra window and thus repeatedly reorient yourself on the visual end product. In some cases, it is thus easier to retain an overview. To open the preview, click on the magnifying glass in front of the title of the evaluation template.In order to edit public templates, you must copy them into your evaluation templates area (Area 3). (If you do not know how to do this, please read the sections above on “Evaluation management and evaluation performance”.) We now assume that the template which you wish to edit is located in the list of your evaluation templates.
- Click on the Edit button. You now find yourself on the first level, which corresponds to the evaluation as a whole. The evaluation is subdivided in a tree structure. You will find the navigation aids below the “Edit evaluation” title line. Here you have the option of changing from higher levels to lower levels.
- Here you see the title and addition information on the template.
 To edit these fields, simply click somewhere in the text and change it.
- Under “Global properties” you can decide
- whether the evaluation is to be conducted anonymously or in personalised form click on the Accept button.
- whether you want to accept the changes to the template click on the Accept button
- whether you want to create additional grouping blocks click on the Create button
- whether the evaluation is to be conducted anonymously or in personalised form
- At the very bottom you see a list of the grouping blocks in this evaluation.
- Click on the yellow arrows at the right

 to shift the block a position higher or lower. Blocks can only be shifted on the same hierarchy levels.
- Click on the arrow
 to the left of the title or on the title itself to open the block.
- Click on the yellow arrows at the right
You are now on the second level — the level of the grouping blocks. The grouping blocks themselves do not contain any questions, but instead are a type of container which contains question blocks. Grouping blocks thus prestructure the evaluation. Grouping blocks can contain either question blocks or subgrouping blocks - never both! Question blocks are thus always the last levels or the “leaves of a tree”.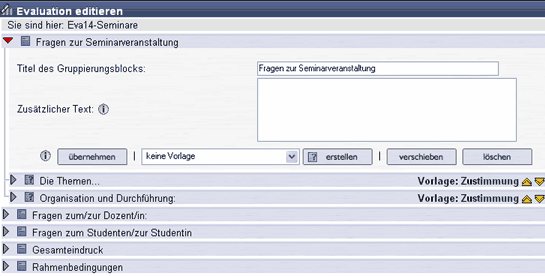
- The image above shows a grouping block and the question blocks it contains. (Other grouping blocks can be seen below it.) On this level you can do the following:
- Change the title of the grouping block and add additional text
- Accept the changes on the grouping block
- Create a new question block
- Move the grouping block
- Delete the grouping block
- Change the position of the question blocks using the yellow double arrows
- To move blocks, please click on the “Move” button. You then see a text, which tells you where you can move the grouping blocks to. In another grouping block, which is either empty or contains other grouping blocks (but never question blocks). You can also move the grouping block onto the uppermost level. All locations into which you can move the grouping block have a yellow double arrow
 . at the right. Click on this arrow and the block will be moved.
Before we create a new question block, we first want to edit an existing one.
- Open a question block by clicking on the arrow in front of it or on the name of the question block.
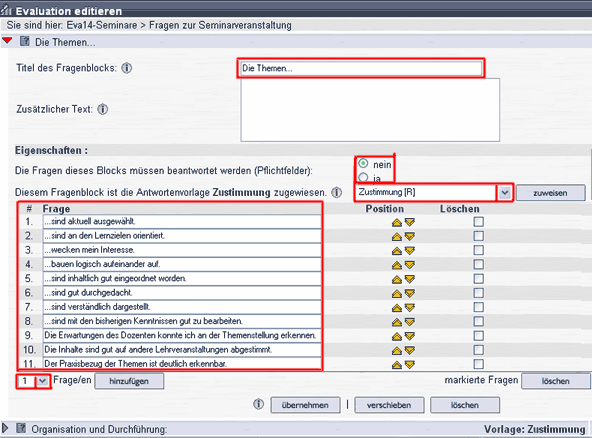
You are now on the question block level and can adapt the questionnaire to your conceptions by changing, deleting or adding questions.
- On this level you can do the following:
- Change the title or the topic of this block (and naturally add additional text)
- Decide whether the questions in this block must be answered or not in this context, mark them either "yes" or "no" (the decision then applies for all the question in the block/the entire block)
- Assign a new answer template Select a new template from the selection menu (to do so, click on the small arrow)
- Delete or add questions
- Change the position of questions ( )
- Move the entire block to another position in the tree or delete it completely
- Accept the changes
- To move question blocks: Question blocks can only be moved into empty grouping blocks or into grouping blocks with other question blocks. To move them, click again on the yellow double arrow .
Creating your own question templates
Before you create a template of your own, please check whether it would not be more expedient to modify an existing template and adapt it to your wishes. If you decided to make a template of your own, click on “Create a new evaluation template” in Area 1. The following page opens.If necessary also read the other sections on evaluations.
1st level: Global properties of the evaluation
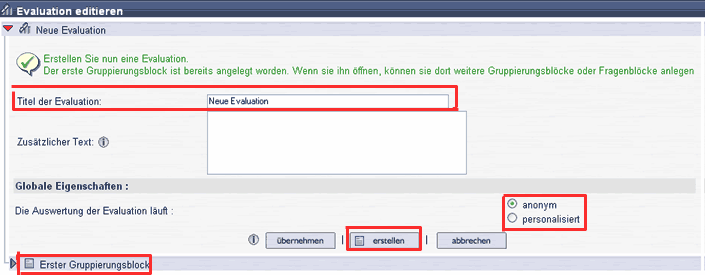
- To begin with you should give your evaluation a name and possibly add additional explanatory test. You are on the highest level of the evaluation and also specify whether the evaluation is to be conducted anonymously or in personalised form. Simply mark the corresponding field.
- You see that the first grouping block has already been set up. Open it by clicking on it to edit it or click on the “Create” button to create additional grouping blocks on this level.
2nd level: Properties of the grouping blocks

- Enter an expressive name for the grouping block
- Within the grouping blocks you have the possibility of doing the following:
- Creating other grouping blocks to do so click on
 or
or
- Create question blocks to do so click on
 (notice the question mark on the icon)
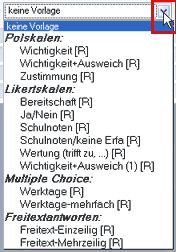
Question and grouping blocks can never be located in one and the same block. Grouping blocks thus contain either other sub-grouping blocks or question blocks.- Here you can also select an answer template, which will then be adopted for the entire grouping block as default. However, you can change the answer templates at any time because the template selection menu is located on every level – except for the uppermost one.
- Click on the Move button to move the grouping block.
- Grouping blocks can be moved into other grouping blocks if these are empty or contain other (sub-)grouping blocks. (Sub-)grouping blocks can also be moved to the uppermost level.
- Click on the yellow double arrow at the position to which the grouping block is to be moved. (If there is no such arrow at that location, the block cannot be moved there.)
- To delete the grouping block and all the subblocks, click on Delete.
- Click on the button for creation of a question block
 . Subsequently, click directly on the question block to open and edit it.
xth level: Properties of question blocks
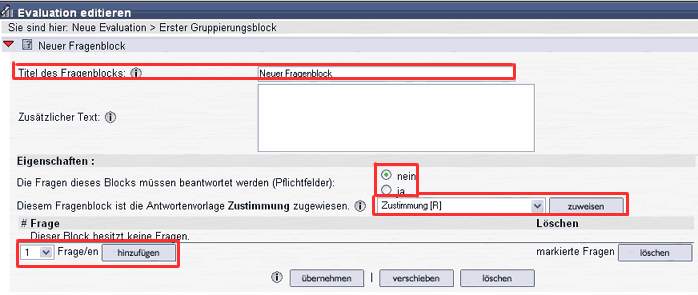
- Enter an expressive name for the question block.
- Decide whether or not answering the questions is optional. To do this, mark either "no" or "yes".
- If you want to change the default answer template or if you have not yet assigned an answer template, you can change that here. Select a template from the selection menu and click on Assign.
- Now add the number of questions required by this block to it.
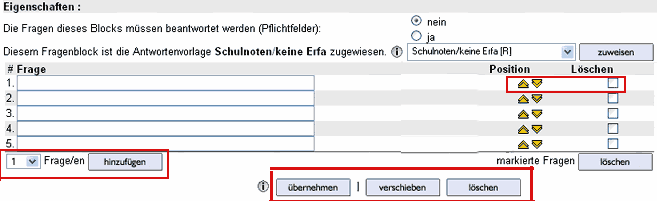
- Enter the questions in the appropriate fields. You can add questions at any time if you need more or also change the answer template.
- To the right of the questions you see yellow double arrows with which you can change the position of the individual questions within the question block. If you want to delete a question, mark the field corresponding to the question in the “Delete” column and subsequently click on the “Delete” button.
- The three buttons on the bottom margin refer to the question block and not the individual questions. Delete means: the entire question block with all its questions will be deleted. Move means: the entire question block will be moved. Question blocks can only be moved into other grouping blocks if these are empty or contain other question blocks. Accept means: The changes in the evaluation are accepted.
There is a Accept button on every level. Click on it to save the evaluation. Despite the click, you remain where you are and can continue working on the evaluation there. You can have the computer display a preview of the evaluation at any time. There is a link in the “Preview” information box at the right side which does this.